|
| Swaps | Seasonal/Holiday | Jewelry, Beads |
| Recycled | Birdhouses | Cloth, Yarn, String |
Crafts that use Recycled Materials:
 Recycled Material Craft Websites
Paper:
- Kid's Domain Craft Exchange - Paper and Cardboard
- Iris folding - easy paper folding technique that can be used to make greeting cards, on scrapbook pages, or designs can be framed and hung on a wall
- How to make paper beads - 8 steps
Other products:
- Kid's Domain - Popsicle/ Craft Sticks
- Kid's Domain Craft Exchange - Made with Tubes
- Kid's Domain Craft Exchange - From Boxes
- Kid's Domain Craft Exchange - With Fabric
- Kid's Domain Craft Exchange - From Natural Materials
- Kid's Domain Craft Exchange - CDs and Diskettes
- Kid's Domain Craft Exchange - Jars and Cans
Seasonal:
Cookie Cutter Crayons
(Source: Free Kids Crafts, http://http://www.freekidscrafts.com)
With this project you can make new crayons out of your old ones that have been just sitting around. Your kids will think of them like new, and you can also attach them as a little decoration on gift wrap. But remember: you must have yourself or another adult monitor your children if they do this because this requires the melting of the crayons' wax.
This project is rated EASY to do.
Supplies:
- Several old crayons
- Assorted cookie cutters or candy molds
- Old sauce pan or tin can for melting crayons
- Aluminum foil
Steps:
- Take the paper off of the crayons and put them in an old saucepan. Or put the crayons in an empty tin can and place the can in a saucepan filled with water.
- Melt the wax by turning the stove on low heat.
- Place the cookie cutters on a sheet of aluminum foil. Pour the melted wax into assorted cookie cutters. You may need to hold the cookie cutters down to keep the melted crayons from running out.
- Wait for the wax to set, then cool, and pop your brand new crayons out.
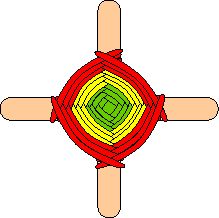
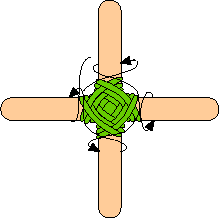
God's Eyes:
(images from: http://www.kidsdomain.com/craft/godseye.html)
Supplies:
- String or yarn in several colors
- 2 Popsicle or craft sticks (or longer sticks)
- Glue
- Scissors
Steps:
- Glue the two sticks together to form an "X."
- Take one color of yarn and wrap it over and around one stick, then over and around the next, over and around the next, and so on. Repeat until you have as much of that particular color as you want.
- Tie a different color string onto the old one with a tight knot.
- Repeat steps 2 + 3 until complete.
- Take a piece of string for a hanger, cut it, and tie or glue it to your God's Eye (or drill hole in tip of one stick). Hang it up in your room to enjoy. Also makes a great Christmas tree ornament.
Variations:
- Use larger craft sticks - up to a couple feet long. Can create a concave "eye" by increasing tension in outer layers.
- Wrap on top of one stick and under the other. Change wrapping pattern when change yarn colors.
Pop Stars:
(http://www.kidsdomain.com/craft/popstar.html)
Supplies:
- 10 popsicle sticks
- Piece of paper and a pencil
- Glue
- Fishing line or fine string
- Paint, glitter, etc.
Steps:
- Draw a 5 tipped star on a piece of paper, with each side the same length as one stick.
- Place a stick on one line then put glue on top of one end of the stick.
- Position the second stick on top of the glued end and along the next side of the star template.
- Continue steps 2 and 3 until all 10 sticks are in place.
- Decorate as desired. Gold, red and green make great Christmas stars. Use other colors for other holidays or themes.
- Attach some fishing line or string to one point for hanging.
Variations:
- Use glow in the dark paint
- Use star as the end of a fairy wand.
- Add lace or netting.
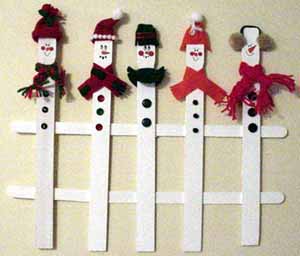 Snowmen
Fence
Snowmen
Fence
(http://www.kidsdomain.com/craft/snowmen1.html)
Supplies:
- 5 paint stir sticks (you get them free when you buy a can of paint - these will be the snowmen)
- 6 wide popsicle sticks (about 3/4" wide by 6" long - these will be the horizontal fence pieces)
- White craft paint
- Black and red fine tipped permanent markers
- Yarn, felt, buttons, pom poms, etc. for making outfits
- Tacky glue
- Hot glue gun
- Ruler
- Scissors
- Wire or string
- Wire cutters, if using wire
Steps:
- Paint the paint stir sticks white. Let dry. You may have to add more than one coat.
- Paint the popsicle sticks white. Let dry. You may have to add more than one coat.
- Draw the snowman faces using markers.
- Create scarves for each snowman and glue in place around the "neck" (the part of the paint stick that curves in). Try felt shawls, scarves, and try braiding yarn for scarves too.
- Cut out hats for your snowmen and glue on their heads. Try making different kinds, using our pictures as ideas. Glue on pom poms for a fun look.
- Glue on buttons, pom poms, or whatever you have on hand for their buttons.
Glue the Popsicle sticks to the back of the snowmen using the wood glue. Be sure to use a ruler to get it close to being straight.
- Add extra wood glue to help strengthen the sticks. You may also wish to glue additional sticks where they touch end to end to give them more strength.
- Hang on a couple of nails, or tie wire or string on the ends so you can hang on one nail.
- Have fun and enjoy creating your Snowmen Fence!